
How to Digitize Embroidery with Inkscape / Inkstitch
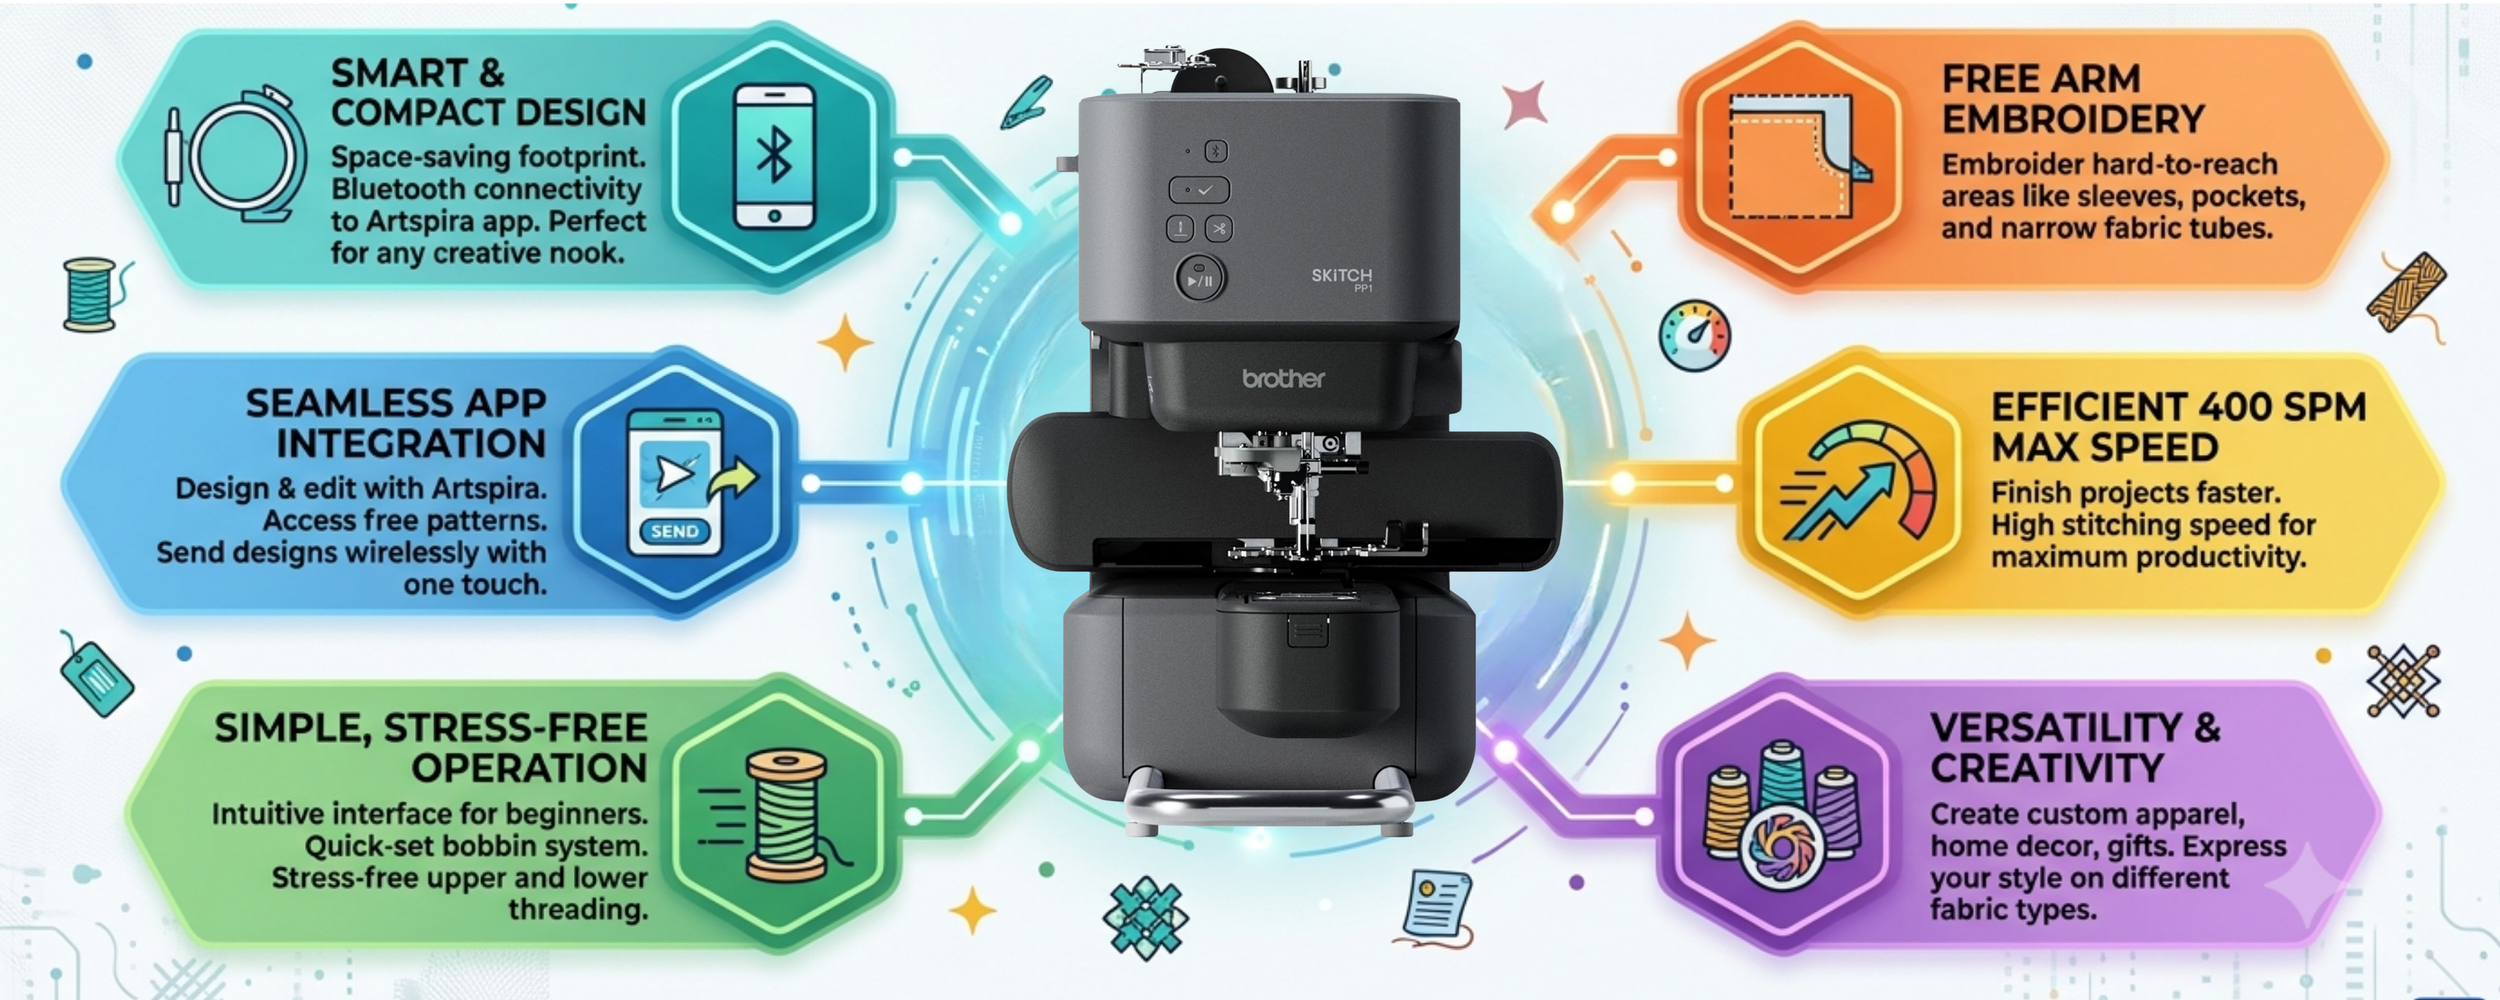
Equipment
limited to 4” × 4” designs
magnetic hoop
Artspira app
Bluetooth connection
Sewology thread (Hobby Lobby)
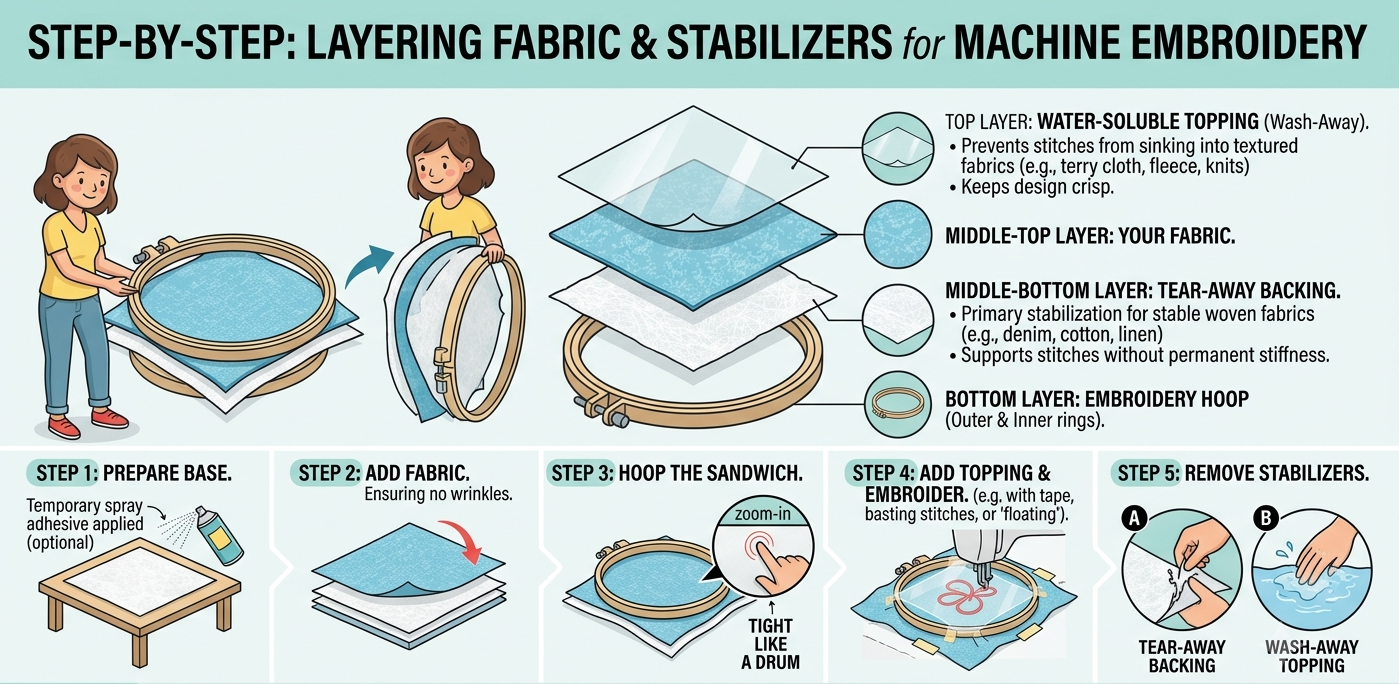
Stabilizer
Wash Away (top layer)
Tear Away (bottom layer)
Plastic sheeting (for patches)
Double sided iron on (for patches)
Basic Designs & Logos
SVG File
Canva
Fonts that convert from SVG to PES with limited editing (Autofill): Bebas Neue, Montserrat, Lora, Lexend, Varela Round, Anton, Norwester
Vectorify tool for graphics & elements
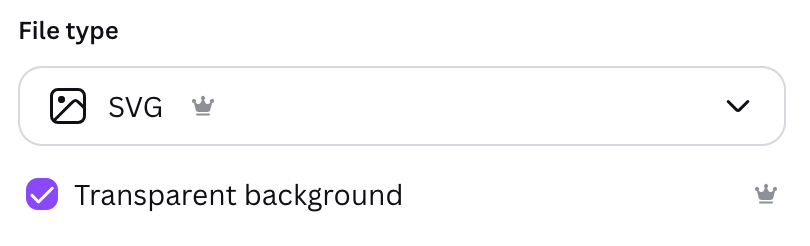
Share > Download
File Type: SVG
Checkbox: Transparent background
The first step is to find or create a vector or SVG file. To create my designs, I use Canva. Once I have all of the components of the design arranged how I like it, I doublecheck my graphics/elements with the Vectorify tool. I find elements with multiple colors do not translate well into Inkscape. One way I work around this is to find an outline of an element I like, copy/paste it and then use the Magic Editor to fill the shape in with the color(s) I want.
Once the design is ready to be exported, I use the Share button in the top right corner and download as an SVG with transparent background.
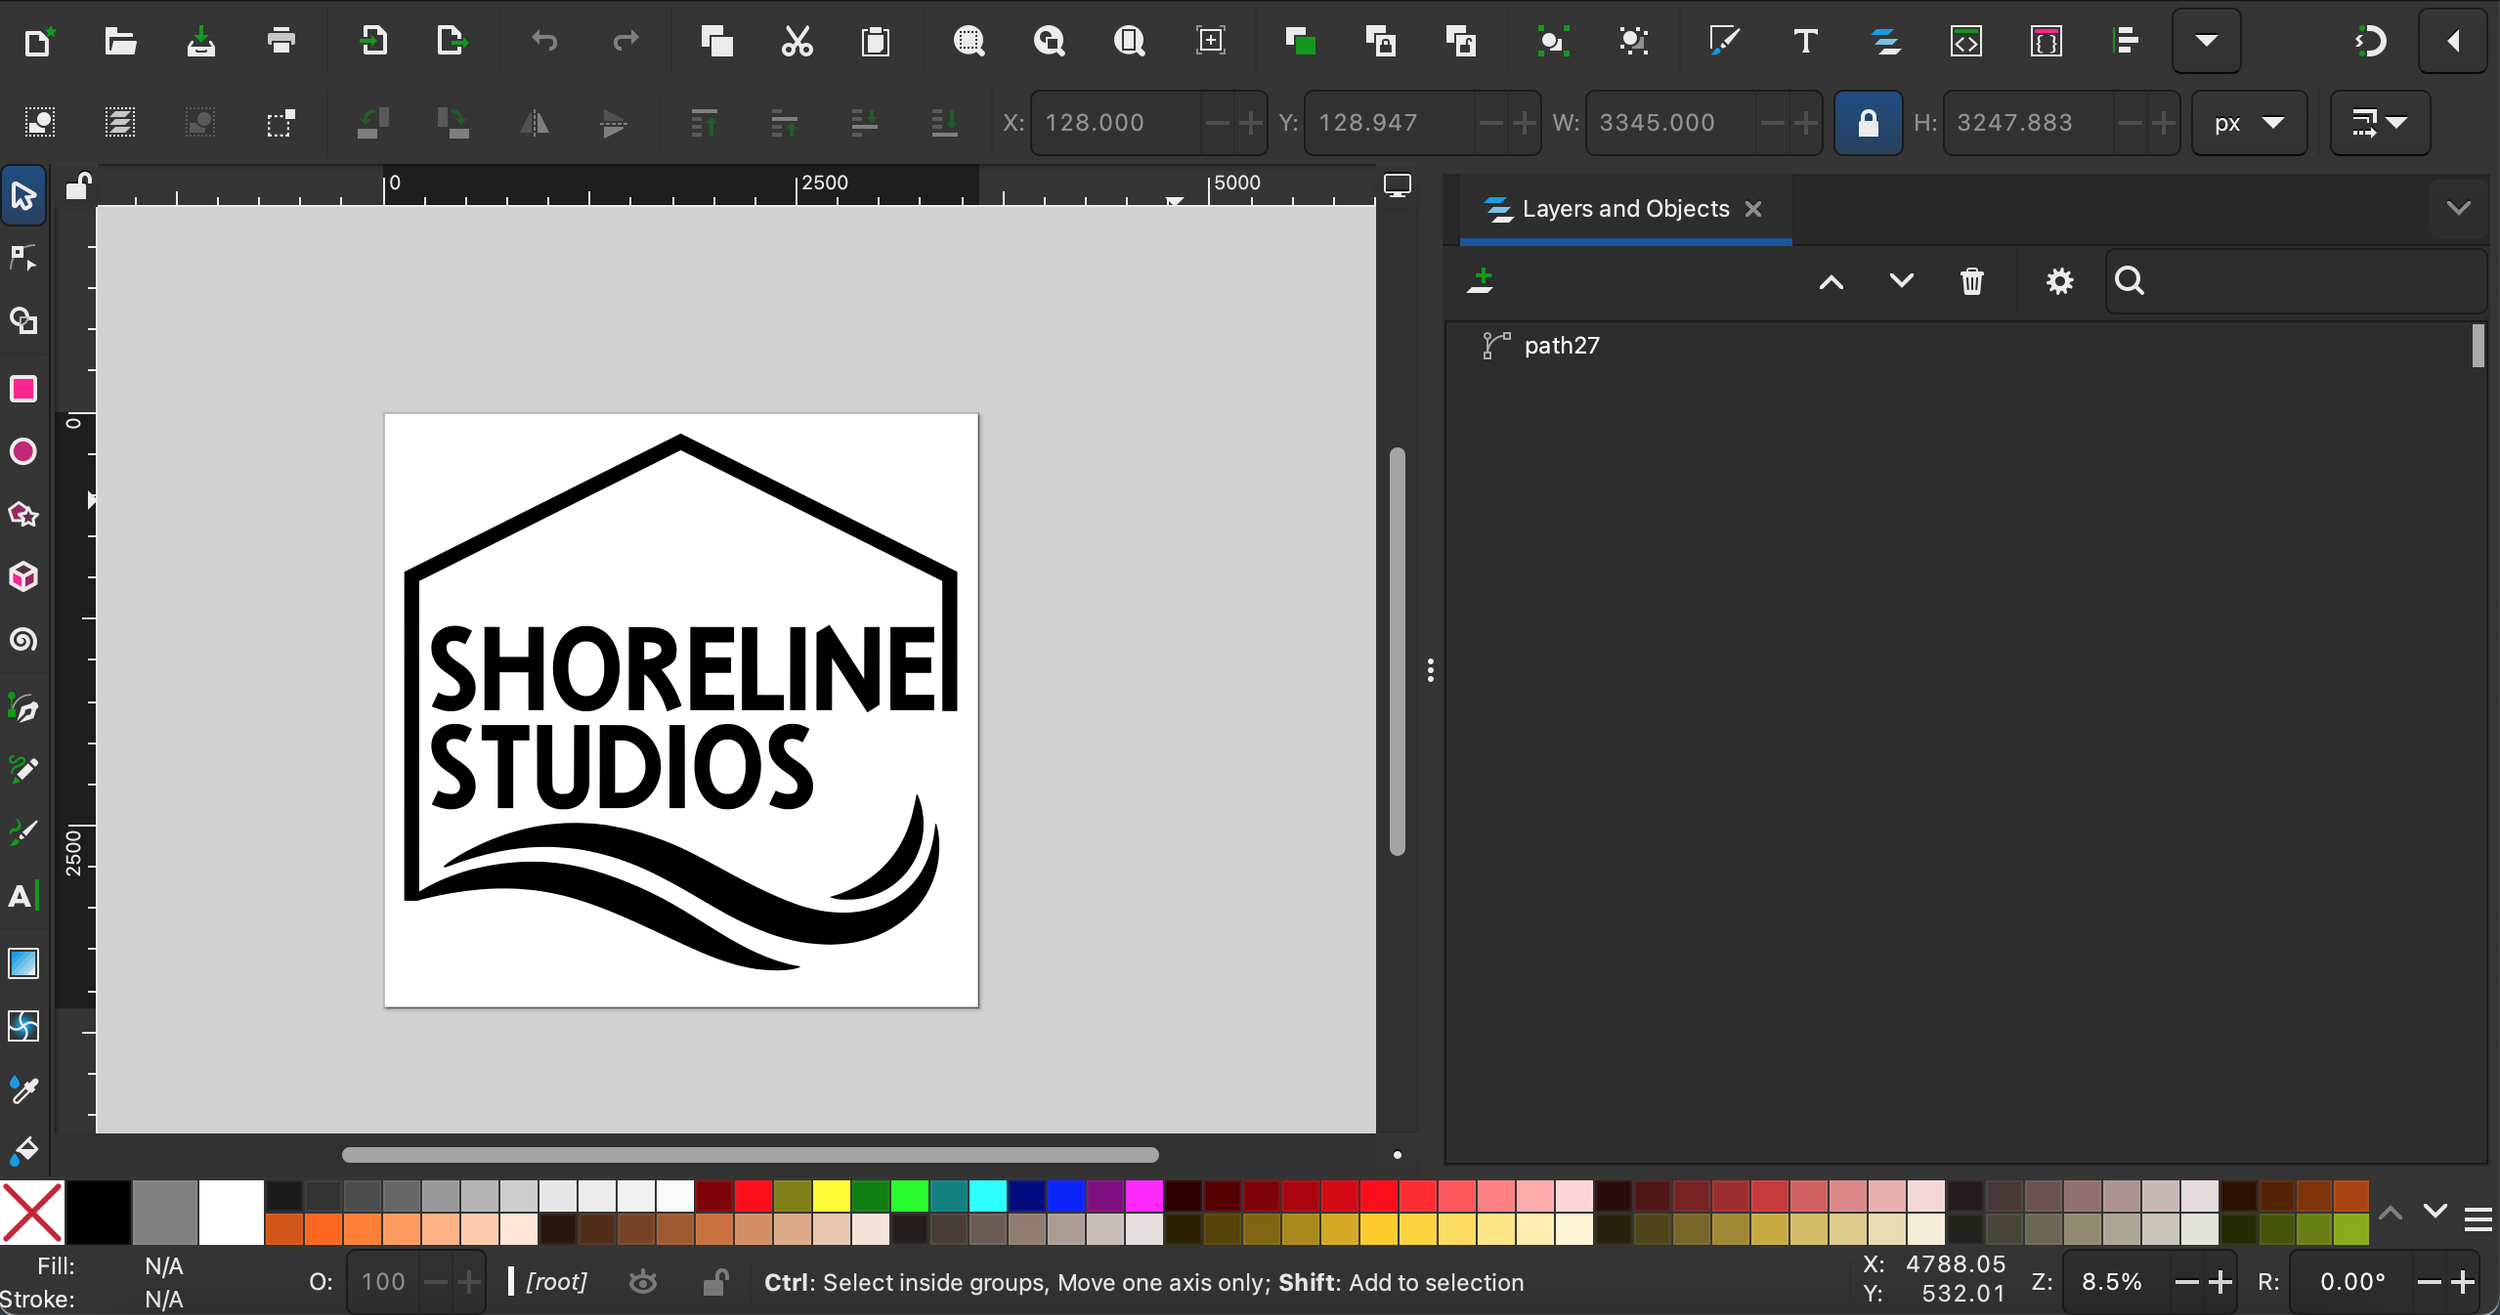
Inkscape
File > Import SVG file
Select all > Ungroup (above the width dimension box)
Select all > Path > Object to Path
Doublecheck the panel to make sure all items have been converted to a Path.
Troubleshoot with Trace to Bitmap or Copy to Bitmap
Group the Paths by color and layer.
Select all > Extensions > Ink/stitch > Params
Fill Method: Autofill
Apply and Quit
Run the Ink/Stitch extension: Re-stack elements in selected order
Preview: Extensions > Ink/Stitch > Visualize and Export > Simulator
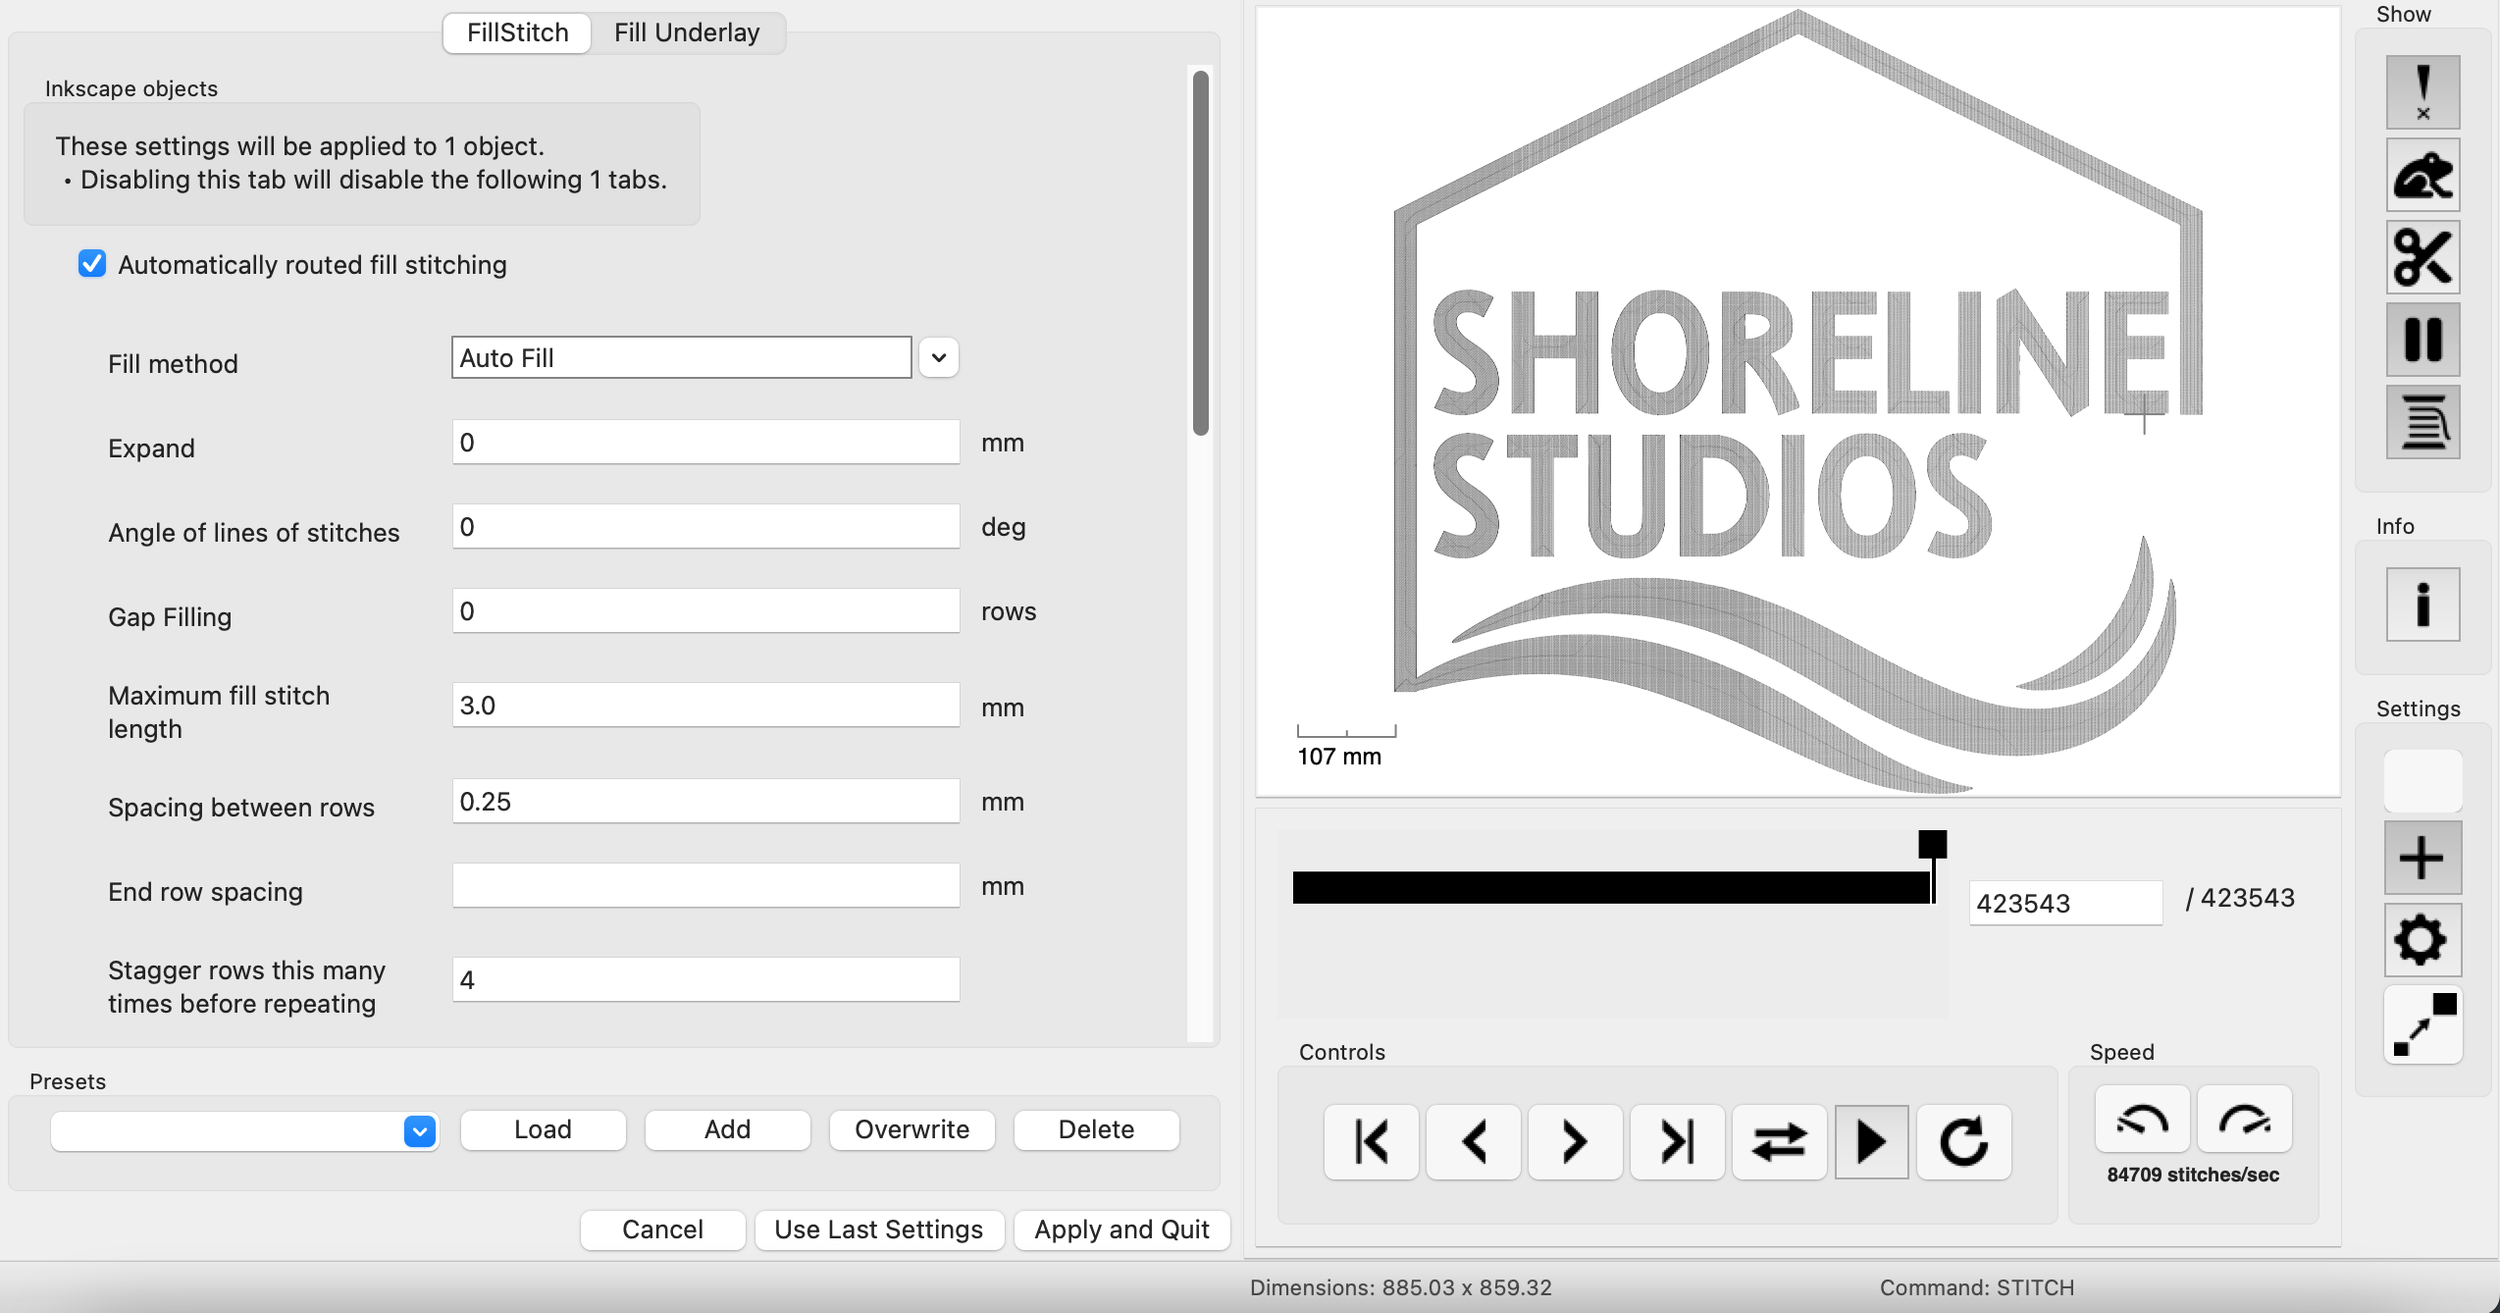
Export File
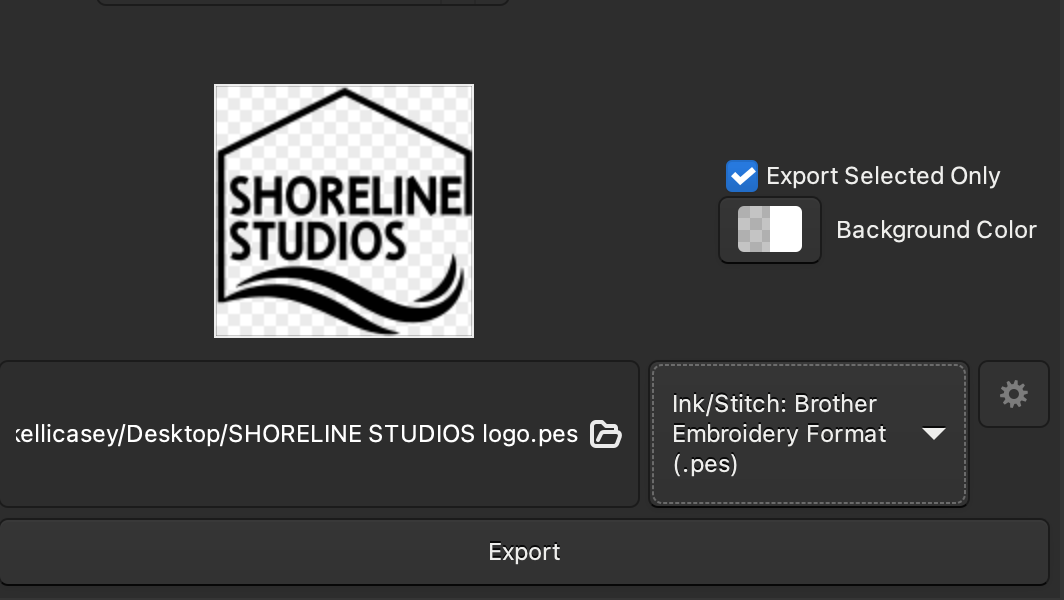
Select all > File > Export
Checkbox: Export Selected Only
Background Color: transparent
File type: Ink/Stitch: Brother Embroidery Format (.pes)
Export button
Text, email or airdrop file to phone
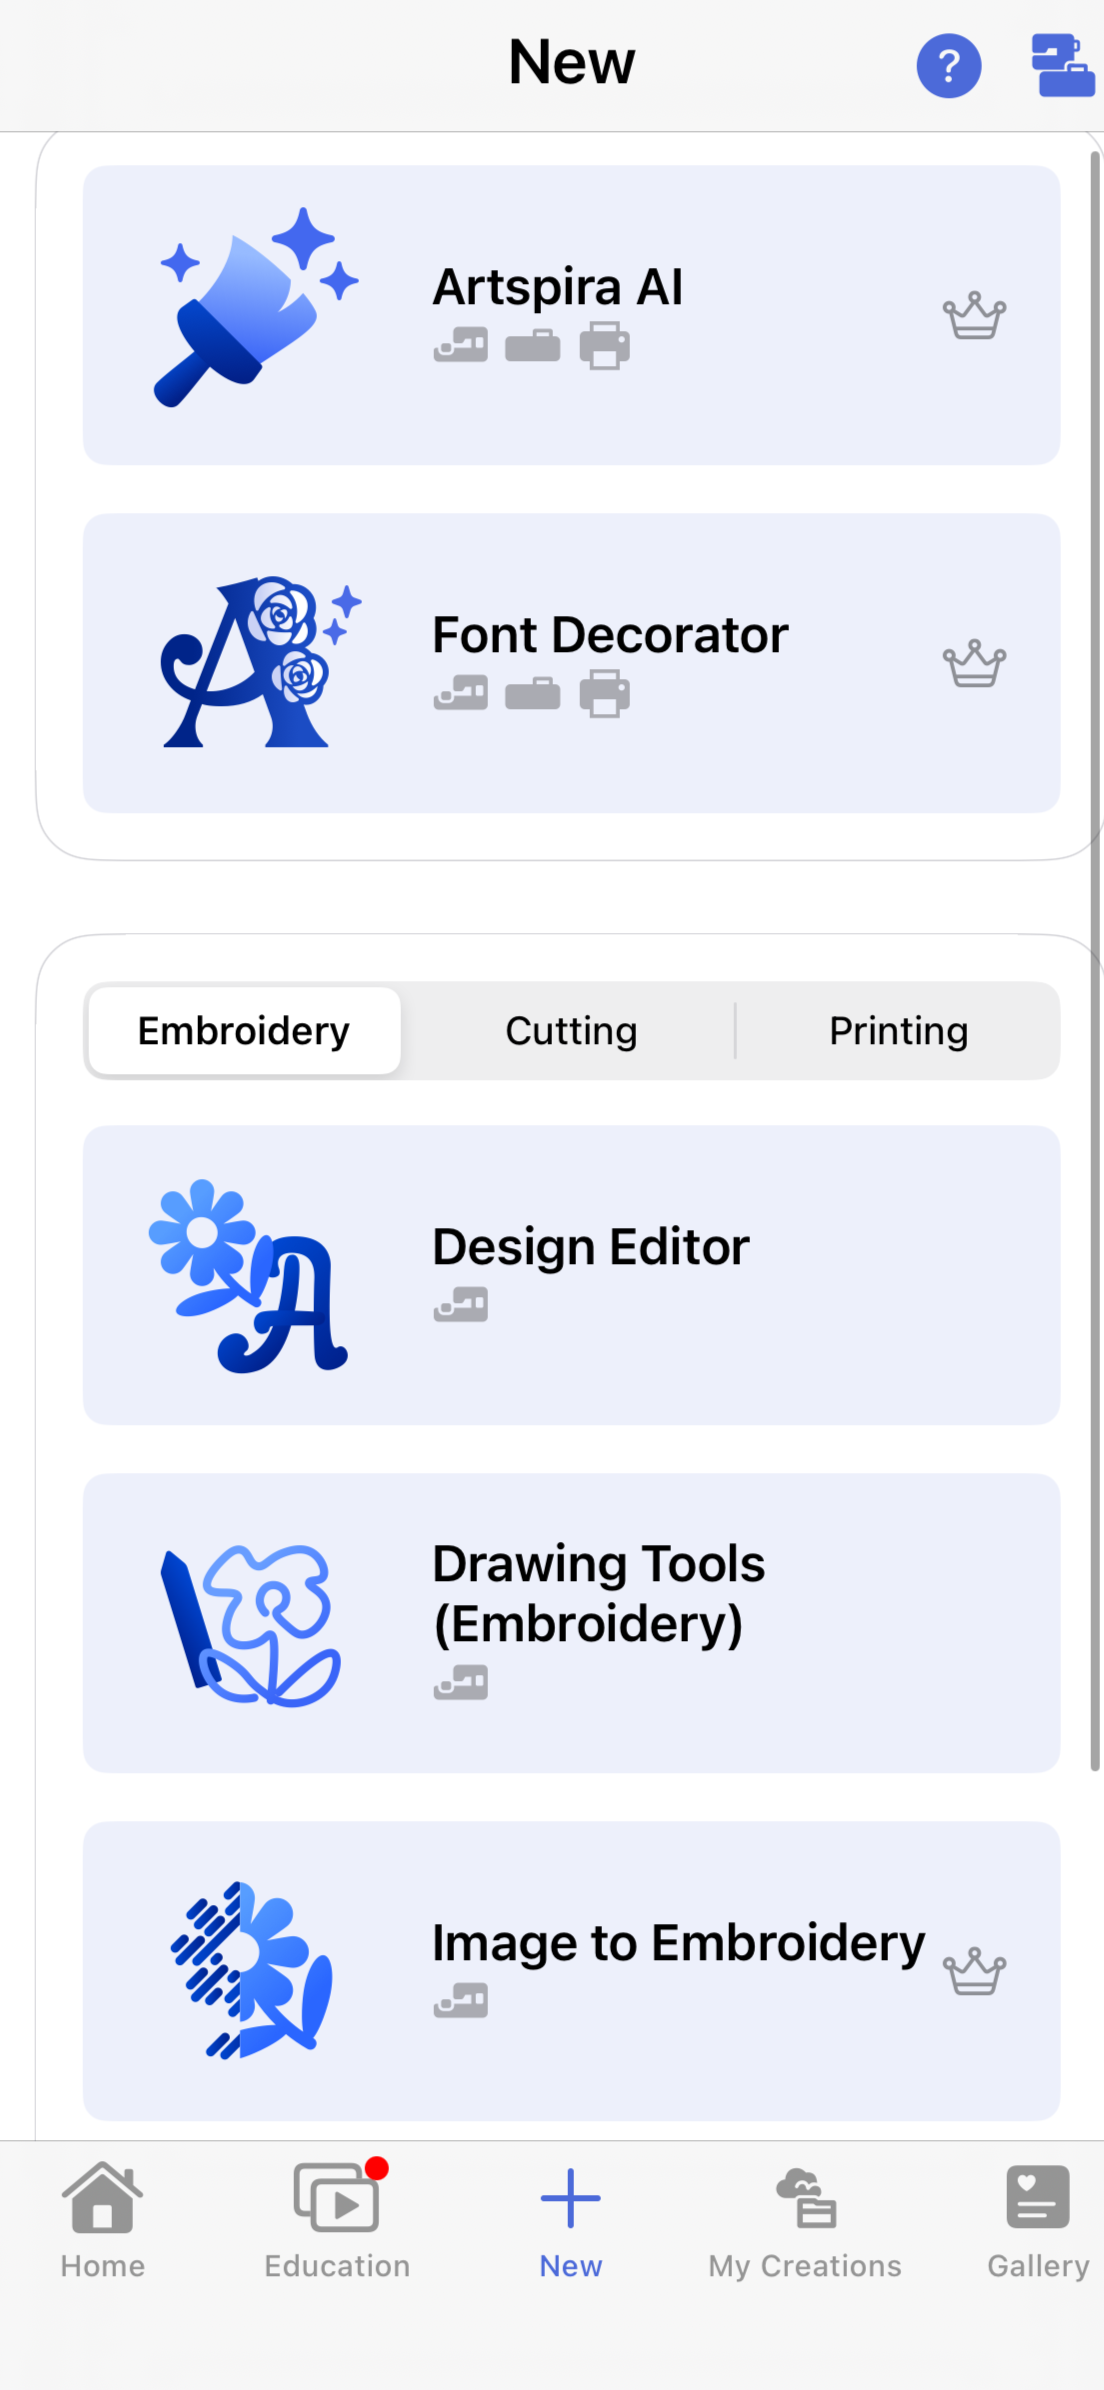
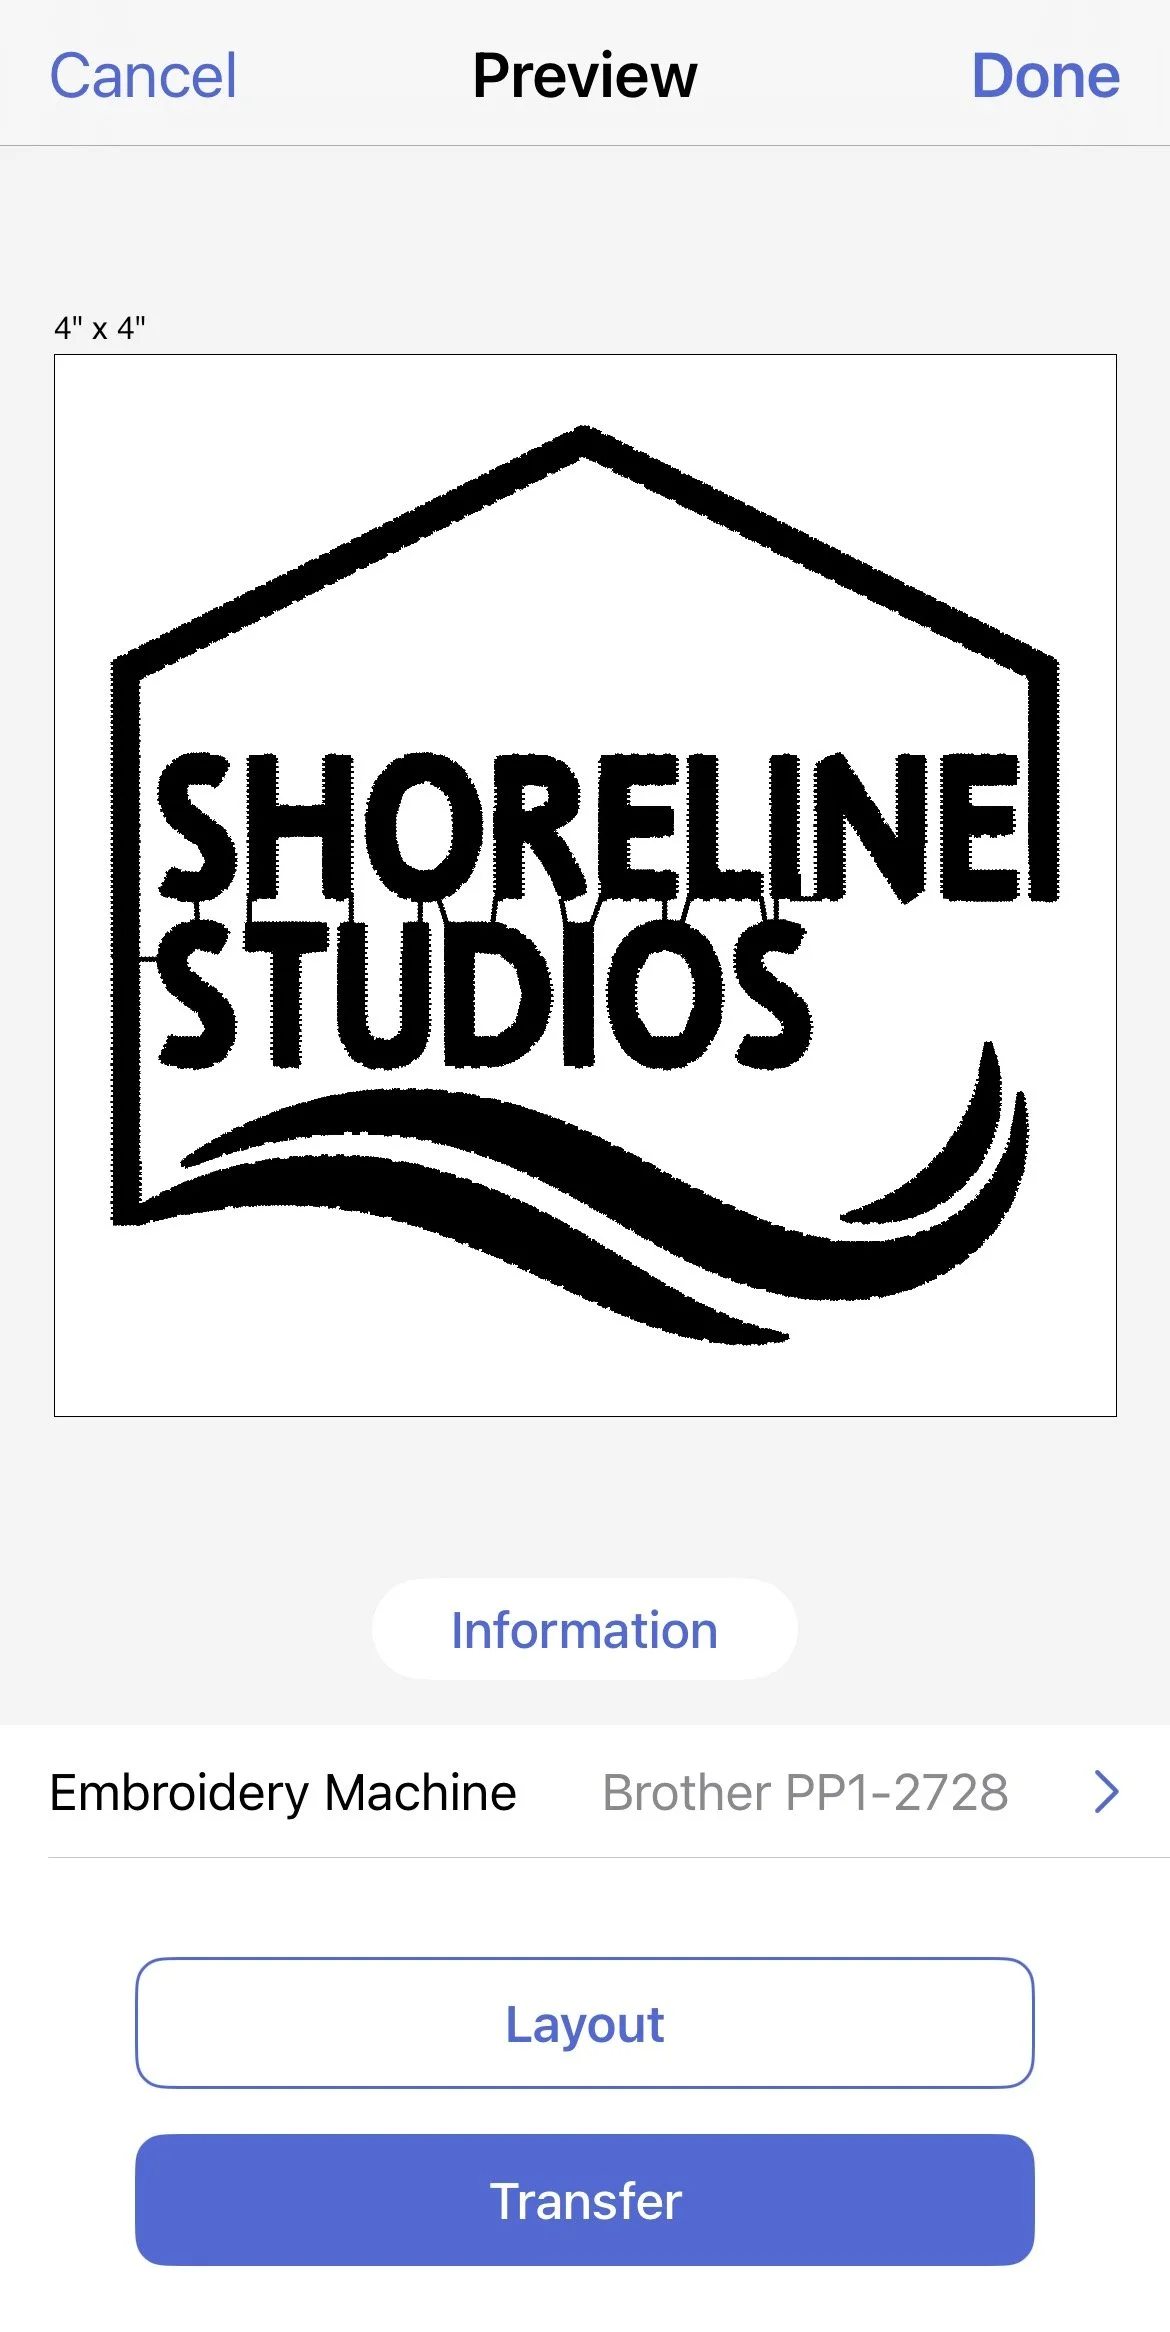
Artspira App
Design Editor (3rd option down)
Import > Import external files
Save > Done > Transfer
Create your embroidered design by following the directions provided in the app and using the corresponding buttons on the machine when prompted.
Understanding the Vocabulary
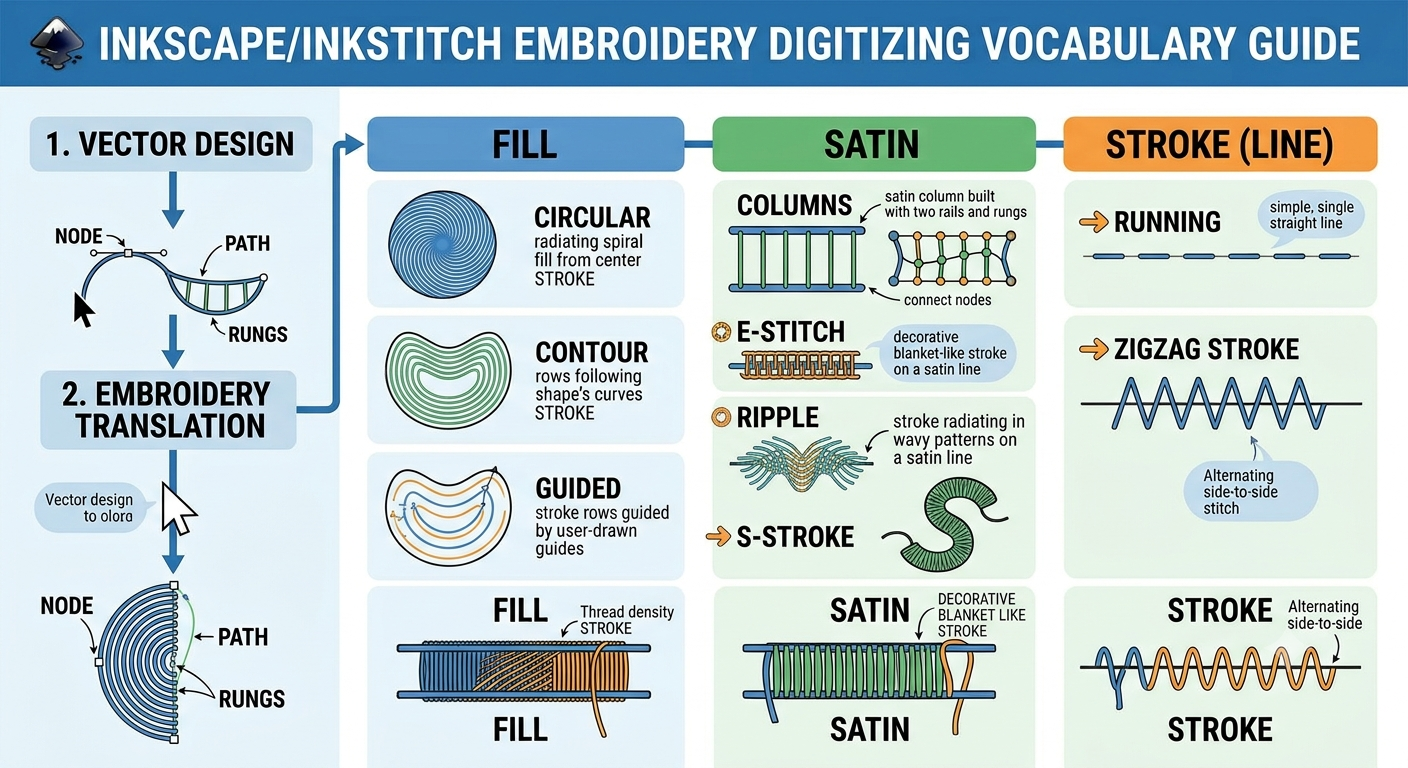
Fill: (often referred to as a Tatami fill) covers large, closed vector shapes with rows of parallel stitches
Circular: fill type that stitches a continuous spiral, starting from either the center or a designated target point and radiating outward to fill a closed shape
Contour: A fill method where the stitch rows curve and mimic the exact outer shape of the vector boundary, gradually nesting inward to create a contoured, dimensional texture
Guided: A highly customizable fill method where you draw a separate "guide line" to dictate the flow and angle of the stitches across the shape, allowing you to create organic-looking curves or watercolor effects
Path: the basic vector object consisting of points (nodes) connected by straight lines or curves. Ink/Stitch translates these paths into actual coordinates for the embroidery needle to follow.
Node: The editable anchor points along a path.
Satin: a dense, back-and-forth stitch used for borders, text, and narrow elements
Columns: A specific Ink/Stitch structure built from two parallel lines (called rails) running in the same direction. The embroidery machine stitches back and forth between these rails to create a dense column of thread.
Nodes: In satin columns, the placement of nodes on opposing rails helps determine where the needle penetrates and how the stitches align.
Rungs: Manually drawn connection lines that bridge the two rails of a satin column. Rungs act as "guides" to tell Ink/Stitch exactly what angle the stitches should take as they move down the column, preventing "slanted" or messy corners.
Stroke (line): A basic linear sequence of needle penetrations along a single path.
E Stitch: A stitch type (often used for applique) that mimics a hand blanket stitch. The needle penetrates along one rail and only reaches across to lock down on the other side at intervals, forming "E" shapes. It is softer than a traditional satin stitch, making it ideal for baby clothing
Ripple: A decorative stroke stitch that acts as a hybrid of a running stitch and a fill. It radiates outward from a central point or curve, creating soft, open-spaced concentric rings that look like ripples on water
Running: The most fundamental stitch type, where the needle follows a path in a single, continuous line
Enabling the Bean Stitch parameter repeats this line back and forth to make a thicker, bolder line.
S Stitch: A textured satin column variation where the stitches are split and staggered to create a patterned, wavy surface reminiscent of a fill stitch but constrained to a column
Zigzag: A simple utility stroke stitch that jumps back and forth across a single line.
While quick to generate, a true Satin Column is usually preferred for finished borders because it handles corners and curves much more cleanly
Advanced Editing
When working with text, choose the font with care. Narrow satin stitches (1 mm wide or less) often produce poor results, so font weight plays a large role in readability. Sans serif fonts are usually easier to work with and produce more consistent stitching.
Convert Canva Text to Satin Columns
To use the exact font style imported from Canva, you need to convert those flat shapes into dual-rail satin columns.
Select individual letters > Fill and Stroke
Fill: “None” (X)
Stroke: solid color
Stroke width (under Stroke Style) to desired thickness (1.5 mm - 6 mm)
Extensions > Ink/Stitch > Tools: Satin > Convert Line to Satin (or Stroke to Satin)
For letters with sharp corners, curves or holes (like the letter A or O)…
Node Tool (N) > Align nodes (equal numbers on both sides and parallel to one another)
Pencil tool (P) > Hold shift and draw a straight line (rung) starting on one rail and ending on the other
Select all text paths > Extensions > Ink/Stitch > Params
Pull Compensation: 0.15mm - 0.3mm
Underlay
If <5 mm tall…disable underlay
If <5 mm tall enable Center-Walk & Contour Underlay
Zigzag spacing: 0.4 mm
Satin Border for Patches
Select your outline > Fill and Stroke
Fill: remove
Stroke: solid color
Stroke style: between 2 mm - 4mm
Extensions > Ink/Stitch > Tools: Satin > Convert Line to Satin
Node tool (N) > Check Node Alignment
Ensure that the nodes on the outer rail sit directly opposite the nodes on the inner rail. If a node on the outer rail is skewed far ahead of its partner on the inner rail, drag it back into alignment.
Pencil tool (P) > Hold Shift and draw a straight line connecting the outer rail to the inner rail. This tells the satin stitch exactly what angle to sew at that specific point.
Select your new rung and your satin rails, then go to Path > Combine
Extensions > Ink/Stitch > Params
Satin Zigzag Spacing (Density): 0.4 mm
Pull Compensation: 0.2 mm or 0.3 mm
Turn on both: Center Walk Underlay & Zigzag underlay
Extensions > Ink/Stitch > Visualize > Simulator
Inkscape Tools
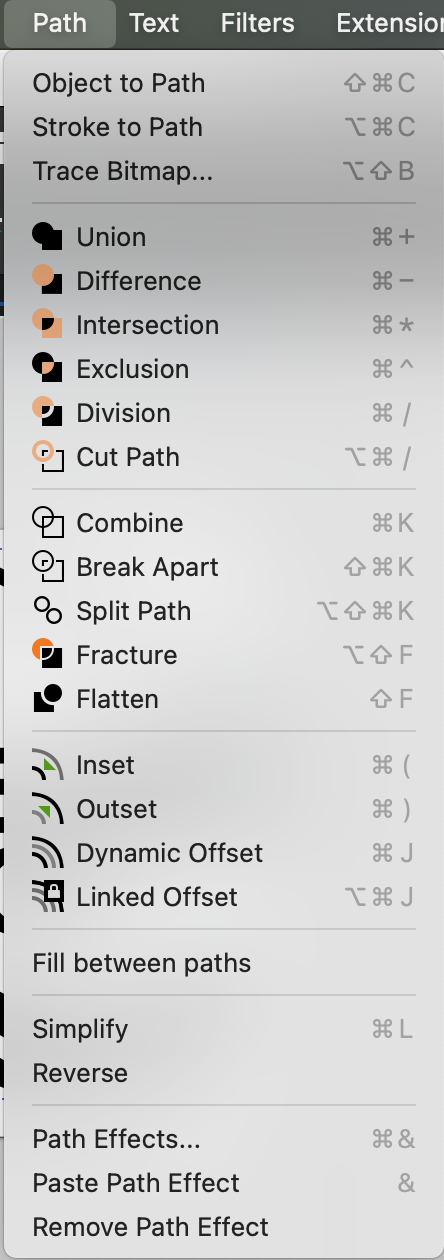
Editing Paths
Object Conversation & Tracing
Object to Path: Converts geometric shape objects (like circles, rectangles, or text) into standard vector paths. This is the essential first step before Ink/Stitch can apply any embroidery parameters to a design
Stroke to Path: Converts an outline (stroke) into a closed vector shape (path) with its own outer boundary. Use this to turn a simple vector line into a wide, fillable shape, or to create a boundary path for a satin column
Trace Bitmap: Opens a dialog to convert imported raster graphics (like JPGs or PNGs) into scalable vector paths, laying down the baseline artwork needed to digitize a design
Boolean Operations (Shaping Tools)
Union: Merges two or more overlapping paths into a single, continuous outer path. Perfect for combining overlapping design components to prevent the embroidery machine from stitching unnecessary hidden layers.
Difference: Uses the top selected path like a cookie cutter to cut a hole into or trim the bottom selected path
Intersection: Retains only the areas where all selected paths overlap, deleting everything else.
Exclusion: Keeps only the non-overlapping portions of overlapping paths, creating a gap where they once intersected.
Division: Cuts the bottom path into separate pieces using the boundary of the top path, much like slicing a cake.
Cut Path: Uses the top path to slice through only the strokes/outlines of the bottom path, leaving behind open-ended line segments with no fill.
Advanced Path Breaking & Joining
Combine: Links multiple disconnected vector paths into a single object. Highly useful for keeping design elements of the same thread color grouped together for streamlined sequence planning in Ink/Stitch
Break Apart: Takes a combined path and separates every single closed segment (including interior holes) into individual, independent shapes.
Split Path: Separates a combined path into individual objects, but unlike Break Apart, it keeps sub-paths with interior holes (like the letter "O" or a donut shape) intact as single, nested shapes
Fracture: Breaks multiple overlapping paths apart at every intersection point, turning all overlapping and non-overlapping sections into their own separate, individual pieces
Flatten: Merges overlapping paths by cropping out any hidden segments, leaving only the visible portions of the shapes intact to eliminate bulky thread buildup.
Offsets and Specialized Paths
Inset: Shrinks a path's boundaries slightly inward. Essential for adjusting vector shapes to compensate for physical fabric pull during stitching.
Outset: Expands a path's boundaries slightly outward, useful for creating clean border outlines.
Dynamic Offset: Creates a path with a single interactive handle, allowing you to drag it to dynamically scale the shape inward or outward while retaining its original proportions.
Linked Offset: Creates a duplicate path that remains dynamically linked to the original. When you modify the shape or size of the parent path, the offset duplicate automatically scales and updates with it.
Fill between paths: Generates a new fill object in the gap between two selected, non-overlapping vector paths.
Clean Up & Direction
Simplify: Reduces the overall number of nodes on a path while preserving its original shape. This cleans up chaotic vectors (such as those from traced bitmaps) to produce smoother, faster-stitching embroidery.
Reverse: Reverses the starting and ending points of a path. This flips the direction in which the embroidery needle travels, allowing you to control and optimize stitch pathing to minimize jump threads
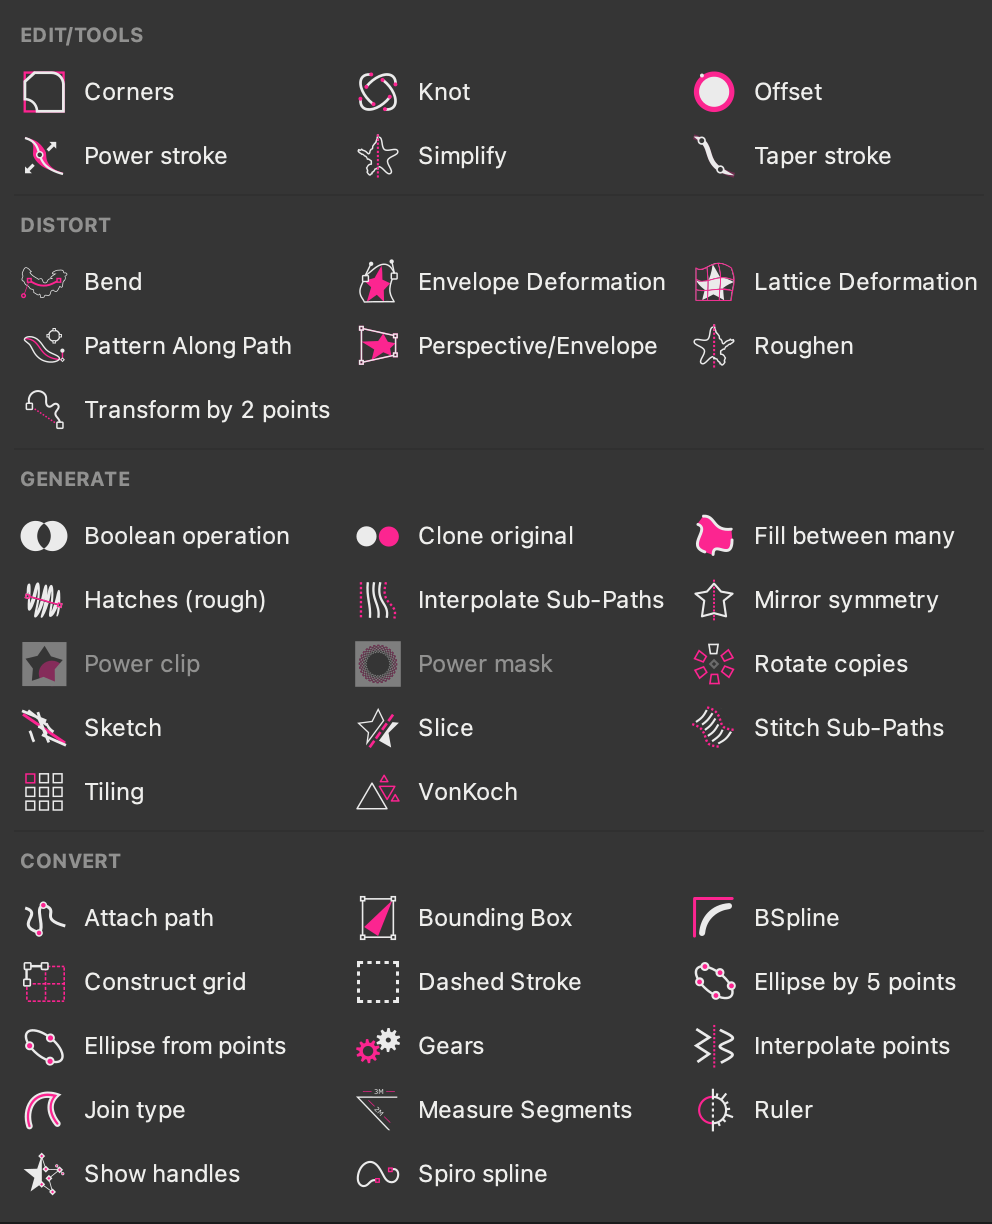
Path Effects
Edit/Tools
Corners: Allows you to interactively round (fillet) or flatten (chamfer) the sharp corners of a vector shape. Excellent for making hard vector lines stitch out with softer, curved corners.
Knot: Automatically creates gaps (gaps in the path) where a path crosses over itself, simulating an over-under woven look.
Offset: Non-destructively expands or shrinks a shape's boundaries. In digitizing, this is indispensable for dynamically adjusting shapes to compensate for fabric pull-compensation
Power stroke: Allows you to define custom, variable widths along different points of a single vector stroke. Great for creating a satin border that changes dynamically from thin to thick.
Simplify: Smooths out a path by reducing unnecessary, messy nodes while maintaining the overall shape. Clean paths mean fewer needle penetrations and smoother machine movement.
Taper stroke: Automatically tapers the start, end, or both tips of a stroke down to sharp points. Useful for preparing custom-width strokes before converting them to satin columns.
Distort
Bend: warps an entire vector path or group along a custom curve that you draw. This is perfect for bending uniform text or fill patterns along an organic, curved line.
Envelope Deformation: Warps a path using four editable boundary lines (top, bottom, left, right). It acts like a rubber sheet, allowing you to stretch design components to fit specific boundaries.
Lattice Deformation: Places a grid of control points over an object, allowing you to warp, stretch, and distort complex fills or grouped designs uniformly.
Pattern Along Path: Takes one vector path (a pattern) and repeats or stretches it along the length of a second path
Perspective/Envelope: Uses a four-point bounding box to warp an object into a 3D perspective or skewed envelope shape.
Roughen: Adds randomized, jittered imperfections to a smooth path, making it look organic or hand-drawn
Transform by 2 points: Rotates, scales, and moves a path dynamically based on the positioning of two chosen control nodes
Generate
Boolean operation: Performs live, non-destructive shapes operations (like Union, Difference, or Intersection) between paths, allowing you to edit the original overlapping shapes at any time
Clone original: Creates a linked duplicate path that mirrors the geometry and styling of the original path
Fill between many: Generates a new path that automatically fills the empty space between multiple independent open paths.
Hatches (rough): Fills a vector shape with sketchy, hand-drawn parallel lines. This is a quick way to create an open-spaced, light-density sketch fill
Interpolate Sub Paths: Blends and generates a series of transition paths between two or more sub-paths (for example, morphing a circle path into a square path over several steps).
Mirror Symmetry: Automatically mirrors anything you draw on one side across a customizable axis. Perfect for symmetrical elements like butterfly wings or central emblems
Power clip: A highly flexible, non-destructive clipping mask that lets you crop a path or group to the boundaries of another shape
Power mask: Uses transparency values to mask and fade out portions of an underlying path or group.
Rotate copies: Arranges multiple copies of an object in a circle around a central pivot point. Ideal for creating mandalas, flowers, or radial badges
Sketch: Generates multiple overlapping, loose strokes over your original path to make it look like a hand-drawn pencil sketch
Slice: Uses a line or path to non-destructively split a shape into multiple individual pieces.
Stitch Sub-Paths: Generates a series of perpendicular connecting lines between two sub-paths. This is incredibly useful for generating customized hatching textures.
Tiling: Distributes and aligns copies of a path into a repeating grid or custom tile pattern with control over gaps, rotation, and offsets
VonKoch: Generates repeating fractal geometric patterns (like the Koch snowflake) along the segments of a path.
Convert
Attach path: Snaps and locks the start or end point of one path to another path so they move together when edited
Bounding Box: Generates a simple, editable rectangle that exactly matches the outermost boundaries of the path
BSpline: Converts a standard jagged path into a smooth, flowing curve controlled by pulling on external control handles
Construct grid: Uses a basic path to automatically generate a precise grid of lines based on the size of the original shape
Dashed stroke: Generates highly customizable, non-destructive dashed or dotted patterns along a stroke.
Ellipse by 5 points: Constructs a mathematically perfect ellipse based on the positions of five custom control points.
Ellipse from points: Generates an ellipse or circle path based on key coordinate nodes that you define.
Gears: Generates interlocking, mathematically correct gear teeth vectors along a path
Interpolate points: Generates smooth, flowing curves that are guaranteed to pass exactly through every single node you have drawn.
Join type: Generates smooth, flowing curves that are guaranteed to pass exactly through every single node you have drawn.
Measure Segments: Automatically calculates and displays the physical length of a path's segments, which is incredibly useful for technical layouts.
Ruler: Places ticks and measurements along a path, transforming the vector line into a customized, curved ruler.
Show handles: Draws temporary, visible helper lines indicating where all the node handles lie on a path.
Spiro spline: An alternative curve drawing engine that generates beautifully smooth, sweeping curves without having to manually fiddle with Bezier handles. Perfect for drawing smooth satin rails!
Node Tool

From left to right…
Path Editing and Node Manipulation
Insert new nodes into selected segments: Adds a new node exactly in the middle of any selected segment(s). This is perfect for when you need more control points on a specific part of a shape without changing its overall structure.
Delete selected nodes: Removes the active nodes. Inkscape will automatically adjust the surrounding path to bridge the gap, keeping the path closed if it was before.
Join selected nodes: Merges two separate, overlapping, or nearby nodes into a single node. If they are the endpoints of different paths, this joins those paths together.
Break path at selected nodes: Splits a single node into two independent, overlapping nodes, essentially "cutting" the path open at that exact point.
Segment & Connection Controls
Join selected end nodes with a new segment: Draws a brand-new straight line (segment) to connect two open, unconnected end nodes.
Delete segment between two non-endpoint nodes: Cuts out the line segment directly between two chosen nodes, leaving the nodes intact but creating a gap in the path (turning a closed shape into an open one).
Node Types and Alignment
Make selected nodes corner: Converts smooth nodes into sharp corner (cusp) nodes. This allows you to move one Bezier handle independently of the other to create sharp turns.
Make selected nodes smooth: Aligns the Bezier handles into a straight, continuous line, ensuring the path flows smoothly through the node. However, the handles can still be different lengths.
Make selected nodes symmetric: Forces the Bezier handles to not only stay in a straight line but also remain the exact same length, keeping the curve perfectly balanced on both sides.
Make selected nodes autosmooth: Automatically adjusts the handles as you move the node (or neighboring nodes) to maintain a natural, continuous curve without manual tweaking.
Straighten lines: Flattens the curved segment between selected nodes into a perfectly straight line, removing any active Bezier curves.
Add curve handles: If a segment is straight and lacks controls, this option forces Bezier handles to appear on the selected nodes so you can start bending the line.
Add corners LPE: Applies the Corners (Fillet/Chamfer) Live Path Effect to the selected nodes, allowing you to easily round off sharp corners with a slider or handle.
Conversion Tools
Object to Path: Converts geometric shapes (like rectangles, circles, or text) into raw paths and nodes, unlocking them so you can edit their individual points.
Stroke to Path: Converts the outline (stroke) of an object into a filled shape of its own. For example, a single line with a thick stroke becomes a closed shape with an outer outline.
Options
Show path outline: Displays a thin, red outline of the path's true geometry, which is incredibly helpful when working with thick strokes, complex fills, or transparency.
Show Bezier handle of selected nodes: Toggles the visibility of the interactive "helper" lines and circles (handles) used to bend curves.
Show transformation handles for selected nodes: Displays scale and rotation handles directly around your selected nodes (much like the Select Tool), allowing you to scale, stretch, or rotate a group of nodes collectively.
Show mask(s) of selected objects: Temporarily reveals the boundary and elements of any active masks applied to your selected object.
Show clipping path(s) of selected object(s): Displays the green outline of any active clipping path, making it easy to see and edit the boundaries of clipped artwork.
Ink/Stitch Tools
Core Utilities
Params (Parameters): The most fundamental tool in Ink/Stitch. It opens a configuration and real-time simulator window where you set the stitch properties (such as stitch length, density, pull compensation, and underlay style) for your selected path.
Troubleshoot > Troubleshoot Objects: Scans your selected vector paths for common geometry errors that prevent embroidery generation—such as self-intersecting lines, unclosed paths, or too many nodes—and places visual red warning markers directly on the canvas where issues exist.
Visualize > Simulator: Generates a highly accurate 3D preview of how your embroidery machine will stitch the design. It allows you to watch the stitching order speed up, slow down, and identify unwanted jump stitches before exporting.
Lettering: Opens the native embroidery font engine. It lets you type custom text and choose from a library of pre-digitized, professionally structured satin-stitch fonts.
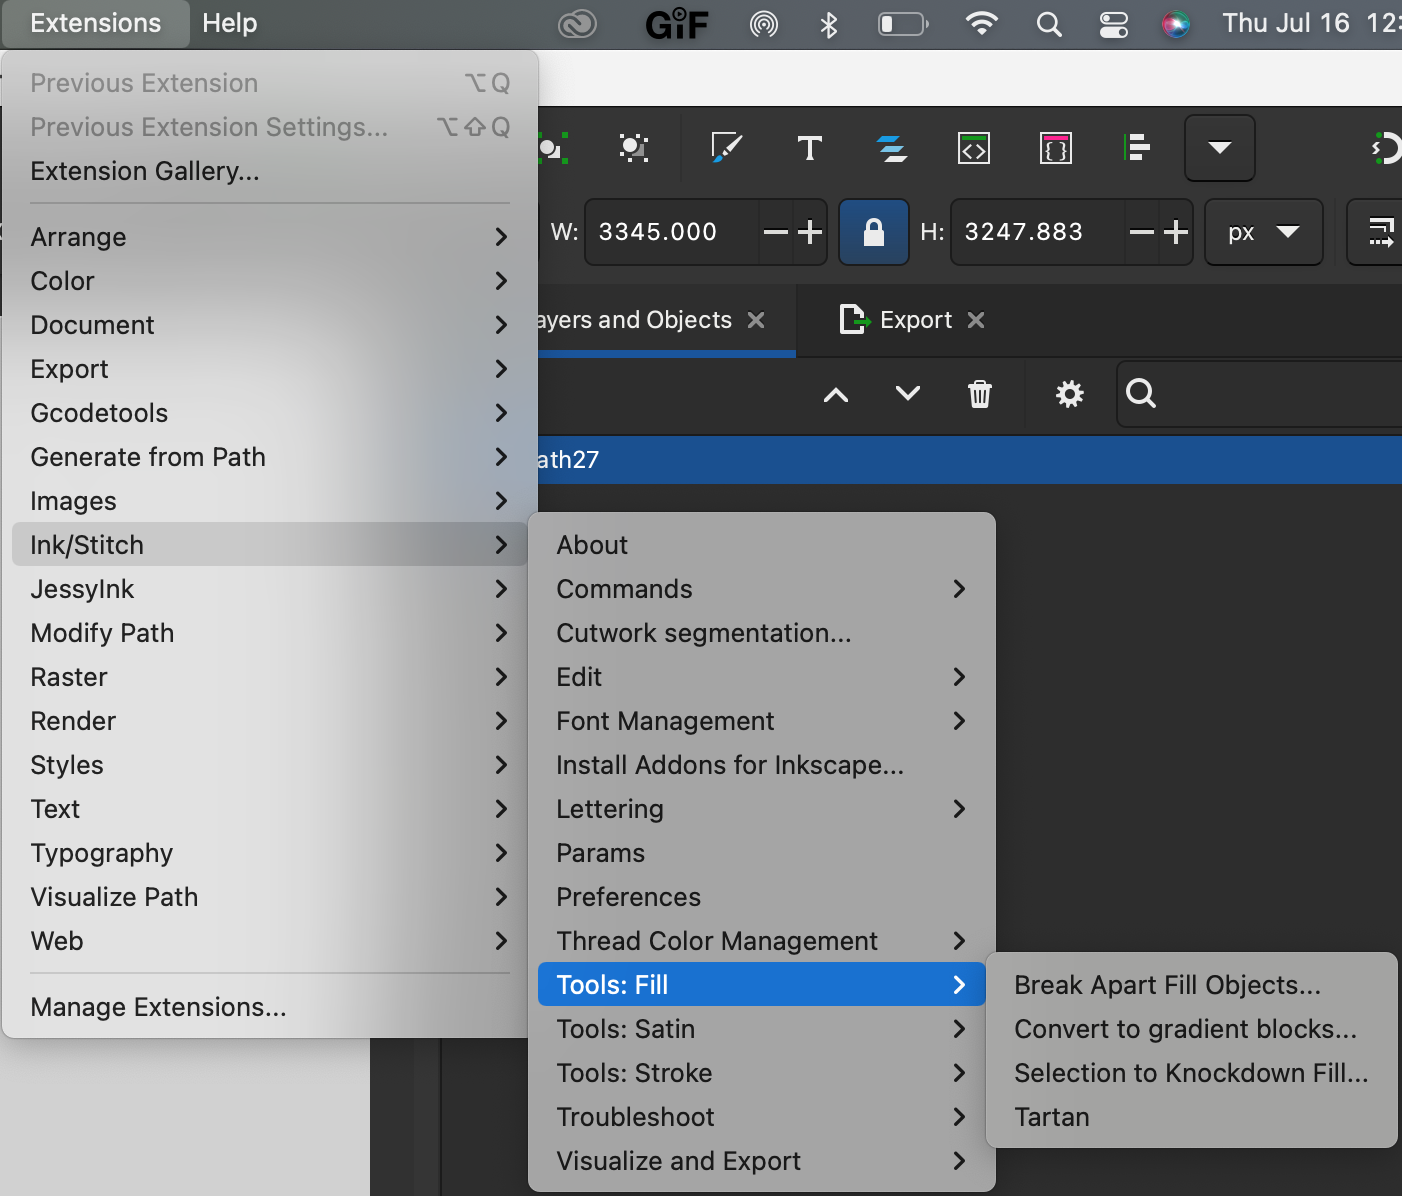
Tools: Fill (Large Areas)
Break Apart Fill Objects: Splits complex shapes with inner "holes" (like a donut) into separate, simplified vector paths that Ink/Stitch's Tatami fill engine can easily process.
Knockdown Fill: Generates a lightweight, low-density grid of stitches beneath your main design. It is used on fluffy fabrics (like terry cloth towels or fleece) to flatten down the fabric nap so the top embroidery doesn't get buried.
Cross Stitch Assistant: Converts colored images or pixel-based artwork into rows of perfect cross-stitch embroidery paths.
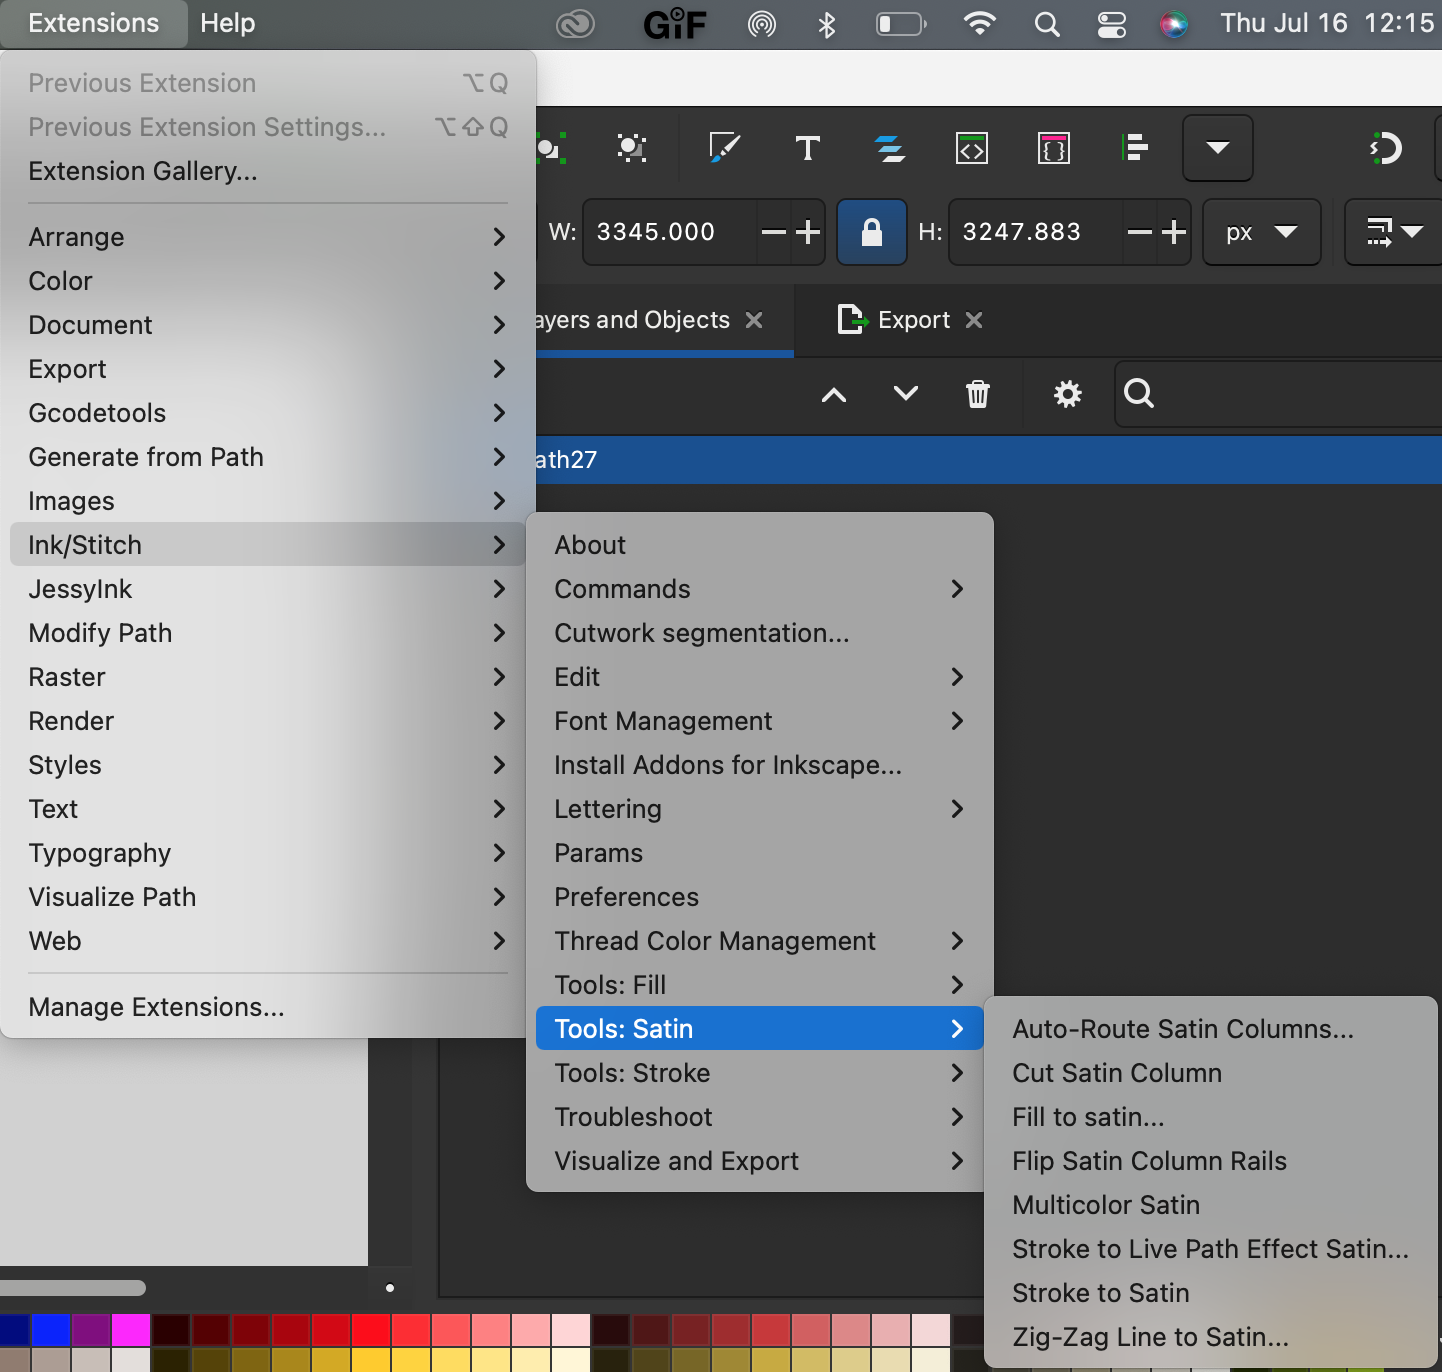
Tools: Satin (Borders and Columns)
Auto-Route Satin Columns: Automatically resequences and links multiple separate satin columns (such as those in complex lettering or borders) to stitch continuously with minimal manual thread jumps.
Convert Line to Satin: Instantly transforms a single standard stroke (line) of varying thickness into an official dual-rail Satin Column with perpendicular rungs.
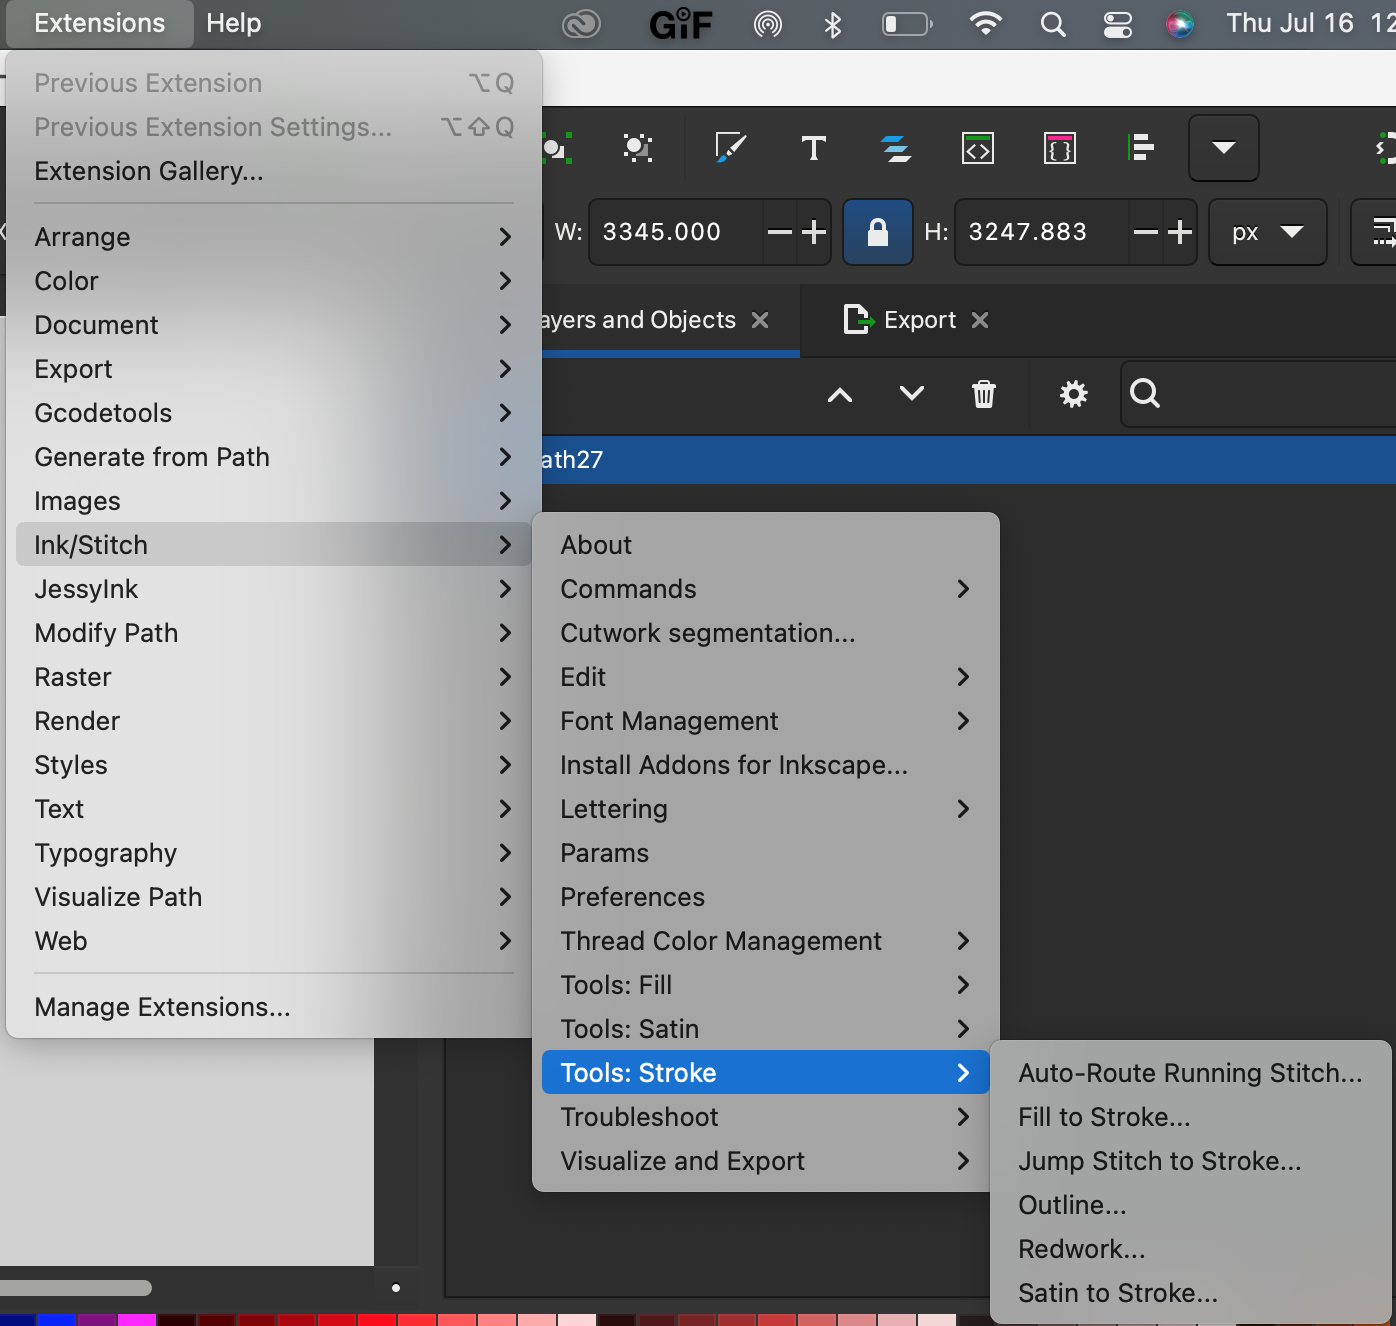
Tools: Stroke (Outlines & Line Art)
Auto-Route Running Stitch: Reorganizes a selected group of running stitch paths into a highly efficient, logical sewing order to minimize jump stitches. It automatically inserts hidden "under-pathing" (travel stitches) where needed.
Convert Satin to Stroke: Takes an existing double-rail satin column and converts it back into a single vector path running down its center.
Fill to Stroke: Converts the outline boundary of a filled shape into a clean, single running stitch stroke.
Visual Commands
These tools attach physical instructions directly to nodes or paths in your file, which your embroidery machine reads during production:
Attach Commands to Selected Objects: Allows you to apply specific markers directly to an object, such as:
Trim: Tells the machine to cut the thread immediately after finishing the selected object.
Stop (Applique Pause): Commands the machine to stop sewing so you can safely place down or trim applique fabric.
Starting/Ending Position: Manually overrides where the machine starts or finishes sewing a specific element.
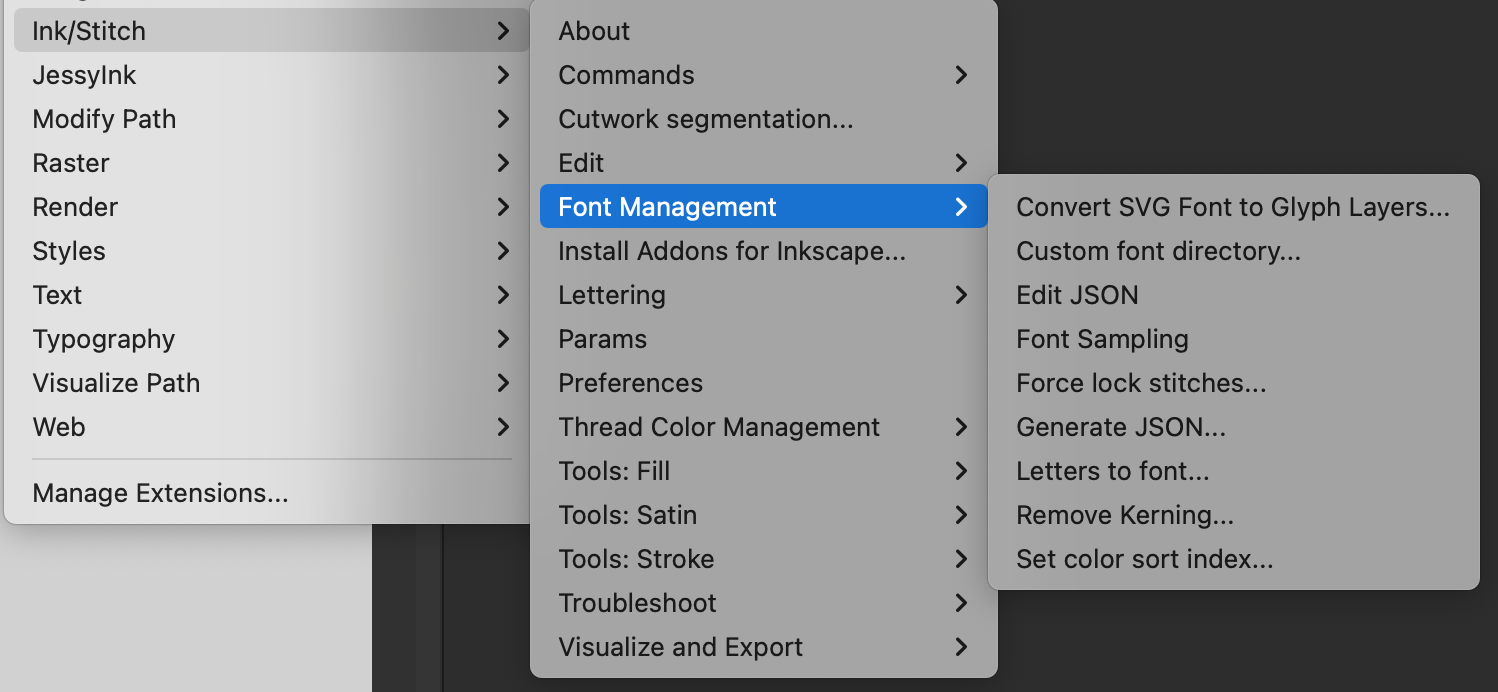
Font Management
Font Creation & Editing
Convert SVG Font to Glyph Layers: Takes a standard vector SVG font and breaks it down into individual, organized Inkscape layers—one layer for each letter (glyph). This makes it incredibly easy to see, edit, and digitize embroidery stitches directly over the shape of each letter.
Letters to Font: The companion tool to the glyph layers. Once you have digitized your embroidery stitches for each letter layer, this tool packages them all back up, publishing your custom embroidery font so it shows up natively inside the Ink/Stitch Lettering tool.
Font Sampling: Generates a quick test sheet containing every character in a selected embroidery font. Digitizers use this to review their work, check for consistency, and test-stitch the entire alphabet to ensure quality.
Technical Configuration (JSON)
Generate JSON: Automatically creates the foundational .json configuration file for a new custom font you are building. It fills in the basic structure so you don't have to code it from scratch.
Edit JSON: Opens an interactive, user-friendly interface within Inkscape to modify an existing font's configuration file. This allows you to easily edit font details like the author name, default stitch density, description, or recommended size limits without touching a code editor.
Custom Font Directory: Allows you to tell Ink/Stitch exactly where to look on your computer for third-party or custom-made embroidery fonts. This ensures any fonts you download or create show up seamlessly in your Lettering menu.
Behavior & Formatting Adjustments
Force Lock Stitches: Automatically injects secure "lock stitches" (tiny, tight back-and-forth stitches) at the very beginning and end of every single letter in a text block. This prevents the thread from unraveling after the machine trims it.
Remove Kerning: Strips away any custom horizontal spacing (kerning) applied between letters, snapping them back to their default, standard baseline spacing.
Set Color Sort Index: Assigns a specific numerical priority to the thread colors within your lettering. When you optimize the design later, this ensures the machine stitches your text in the exact color sequence you intended, preventing unnecessary thread changes.